


Last Updated : 31 Oct, 2022
Android SDK is without doubt one of the most helpful elements which is required to develop Android Applications. Android SDK can also be known as the Android Software Development Kit which offers so many options that are required in Android that are given beneath:
- A pattern supply code.
- An Emulator.
- Debugger.
- Required set of libraries.
- Required APIs for Android growth with their documentation.
- Tutorials required for Android OS growth.
Why There is a Need to Change Android SDK Path?
Android SDK comes itself after we obtain Android Studio. It downloads after we obtain our Android Studio. But many instances on account of some difficulty in our computer these SDK recordsdata could get deleted. And with out your Android SDK Android studio will not be in a position to work and we can not develop any utility. Android SDK is the center of Android studio. We can simply obtain Android SDK from the android builders’ website, however now we have to set the trail for this SDK in our Android studio as effectively to make use of this SDK.
Now the purpose that comes right here is how we are able to change the SDK path for our Android utility in Android Studio. So on this article, we’re going to focus on three totally different strategies to Change Android SDK Path in Android Studio.
Method 1
Step 1: Create a brand new Project in Android Studio
Navigate to the File > New > New Project and create your new undertaking. The language used for this is not going to matter as this course of would be the similar for each java in addition to Kotlin.
Step 2: Opening undertaking construction
Navigate to the File > Click on Project construction which is proven within the listing and click on on the Project construction possibility. After clicking that possibility you’re going to get to see the beneath display.

Inside the above display, click on on the SDK Location possibility you’re going to get to see the beneath display.
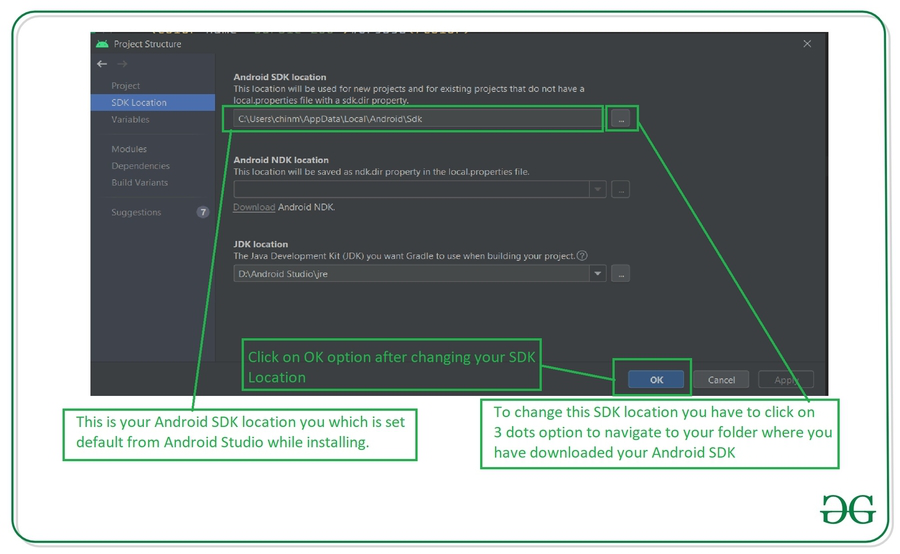
In the above picture, you’re going to get to see the present SDK location to your Android Studio. To change this SDK location it’s a must to click on on the three dots that are being displayed after which choose your SDK location folder. After choosing this folder click on on the OK possibility to avoid wasting your SDK path.
Step 3: Sync your undertaking after including your SDK path
Now sync your undertaking with Gradle recordsdata to verify that SDK is working high quality. To do that click on on File > you’re going to get to see the choice as Sync Project With Gradle recordsdata possibility click on on that possibility and sync your undertaking. On profitable sync of your undertaking, your SDK location is ready completely and now you’re good to go in growing Android Applications.
Method 2
Step 1: Create a brand new Project in Android Studio
Navigate to the File > New > New Project and create your new undertaking. The language used for this is not going to matter as this course of would be the similar for each java in addition to Kotlin.
Step 2: Opening Android Studio Settings
Navigate to the File > Settings possibility you’re going to get to see beneath dialog display. Inside that display. Click on Appearance and Behavior possibility > System Settings choices after which click on on the Android SDK choice to get to see the beneath display.

Inside this display, you’re going to get to see your SDK path. You can replace your SDK path by clicking on the Edit possibility. After that choose your SDK path, then click on on Apply possibility, after which click on on the OK possibility.
Step 3: Sync your undertaking after including your SDK path
Now sync your undertaking with Gradle recordsdata to verify that SDK is working high quality. To do that click on on File > you’re going to get to see the choice as Sync Project With Gradle recordsdata possibility click on on that possibility and sync your undertaking. On profitable sync of your undertaking, your SDK location is ready completely and now you’re good to go in growing Android Applications.
Method 3
Step 1: Create a brand new Project in Android Studio
Navigate to the File > New > New Project and create your new undertaking. The language used for this is not going to matter as this course of would be the similar for each java in addition to Kotlin.
Step 2: Opening undertaking construction.
Inside your Android Studio within the high proper nook, You can get to see the icon beneath the picture for opening the undertaking construction. Click on that choice to open your undertaking construction possibility. You will get to see the beneath display. For opening this Project Structure we are able to additionally use a shortcut key as:
|
Operating System |
Shortcut Key |
|---|---|
| Windows | Ctrl+Alt+Shift+S |
| Mac OS | Command + ; (semi-colon) |
| Linux | Ctrl+Alt+Shift+S |

After clicking on this selection we merely should comply with Step 1 to replace our Android SDK.
Inside the above display, click on on the SDK Location possibility you’re going to get to see the beneath display.
In the above picture, you’re going to get to see the present SDK location to your Android Studio. To change this SDK location it’s a must to click on on the three dots that are being displayed after which choose your SDK location folder. After choosing this folder click on on the OK possibility to avoid wasting your SDK path.
Step 3: Sync your undertaking after including your SDK path
Now sync your undertaking with Gradle recordsdata to verify that SDK is working high quality. To do that click on on File > you’re going to get to see the choice as Sync Project With Gradle recordsdata possibility click on on that possibility and sync your undertaking. On profitable sync of your undertaking, your SDK location is ready completely and now you’re good to go in growing Android Applications.

Improve