


Last Updated : 31 Oct, 2022
Android SDK is without doubt one of the most helpful elements which is required to develop Android Applications. Android SDK can be known as the Android Software Development Kit which offers so many options that are required in Android that are given under:
- A pattern supply code.
- An Emulator.
- Debugger.
- Required set of libraries.
- Required APIs for Android improvement with their documentation.
- Tutorials required for Android OS improvement.
What’s the Error?
Sometimes when the developer import an Eclipse-Android-Project into Android Studio then there could also be a risk of getting the next error
“Please choose Android SDK”
Now the purpose that comes right here is how we are able to repair the “Select Android SDK” error in Android Studio. So on this article, we’re going to focus on 4 totally different strategies to repair the “Select Android SDK” error in Android Studio.
Method 1
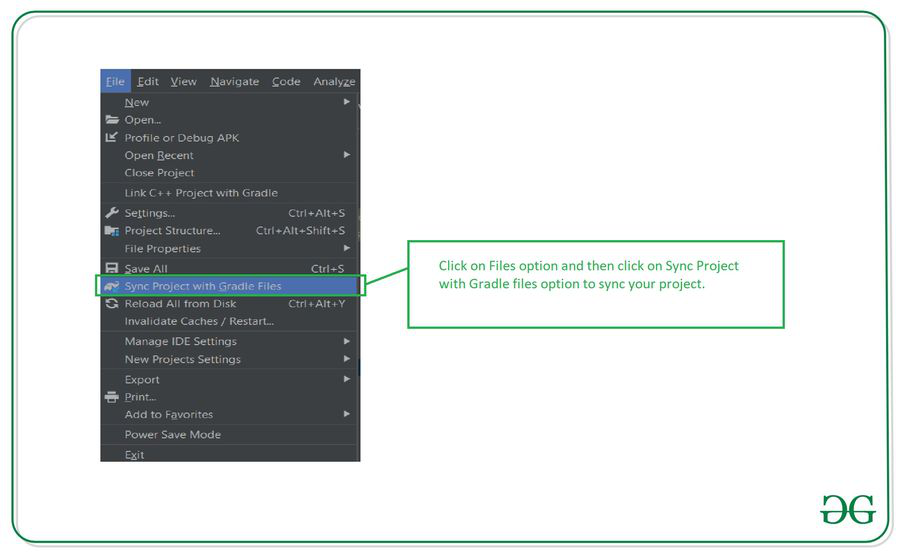
Sync your challenge with Gradle recordsdata
When you open your challenge now merely sync your challenge. To sync your challenge. Click on the Files choice. In that choice, you’ll get to see the choice as Sync Project with Gradle Files. Click on that choice to sync your challenge. After your challenge sync, this situation will likely be resolved. Please discuss with the under screenshot.
Method 2
Step 1: Opening challenge construction
Navigate to the File > Click on Project construction which is proven within the checklist and click on on the Project construction choice. After clicking that choice you’ll get to see the under display.

Inside the above display, click on on the SDK Location choice you’ll get to see the under display.
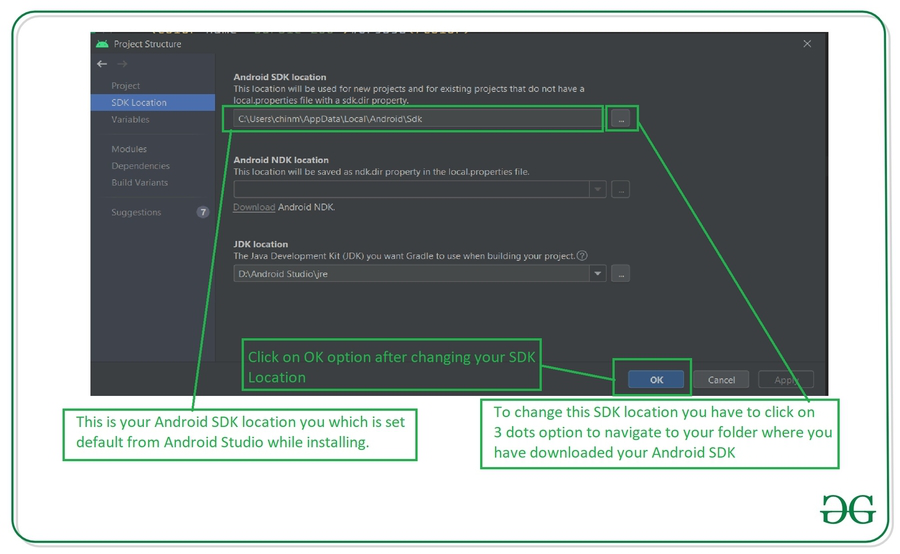
In the above picture, you’ll get to see the present SDK location on your Android Studio. To change this SDK location it’s a must to click on on the three dots that are being displayed after which choose your SDK location folder. After deciding on this folder click on on the OK choice to save lots of your SDK path.
Step 2: Sync your challenge after including your SDK path
Now sync your challenge with Gradle recordsdata to test that SDK is working effective. To do that click on on File > you’ll get to see the choice as Sync Project With Gradle recordsdata choice click on on that choice and sync your challenge. On profitable sync of your challenge, your SDK location is about completely and now you might be good to go in creating Android Applications.
Method 3
Step 1: Opening Android Studio Settings
Navigate to the File > Settings choice you’ll get to see under dialog display. Inside that display. Click on Appearance and Behavior choice > System Settings choices after which click on on the Android SDK choice to get to see the under display.

Inside this display, you’ll get to see your SDK path. You can replace your SDK path by clicking on the Edit choice. After that choose your SDK path, then click on on Apply choice, after which click on on the OK choice.
Step 2: Sync your challenge after including your SDK path
Now sync your challenge with Gradle recordsdata to test that SDK is working effective. To do that click on on File > you’ll get to see the choice as Sync Project With Gradle recordsdata choice click on on that choice and sync your challenge. On profitable sync of your challenge, your SDK location is about completely and now you might be good to go in creating Android Applications.
Method 4
Step 1: Opening challenge construction
Inside your Android Studio within the prime proper nook, You can get to see the icon under the picture for opening the challenge construction. Click on that choice to open your challenge construction choice. You will get to see the under display. For opening this Project Structure we are able to additionally use a shortcut key as:
|
Operating System |
Shortcut Key |
|---|---|
| Windows | Ctrl + Alt + Shift + S |
| Mac OS | Command + ; (semi-colon) |
| Linux | Ctrl + Alt + Shift + S |

After clicking on this selection we merely should comply with Step 1 to replace our Android SDK.
Inside the above display, click on on the SDK Location choice you’ll get to see the under display.
In the above picture, you’ll get to see the present SDK location on your Android Studio. To change this SDK location it’s a must to click on on the three dots that are being displayed after which choose your SDK location folder. After deciding on this folder click on on the OK choice to save lots of your SDK path.
Step 2: Sync your challenge after including your SDK path
Now sync your challenge with Gradle recordsdata to test that SDK is working effective. To do that click on on File > you’ll get to see the choice as Sync Project With Gradle recordsdata choice click on on that choice and sync your challenge. On profitable sync of your challenge, your SDK location is about completely and now you might be good to go in creating Android Applications. On profitable sync of your challenge, your SDK location is about completely and now you might be good to go in creating Android Applications.

Improve